Raiding ‘Raiders’

Raiding

//Breaking down the sequences of ‘Raiders of the Lost Ark’

‘Raiders of the Lost Ark’ to me is the most perfect action movie of all time. Yeah yeah…Die Hard/Heat/Aliens/Terminator/Hong Kong cinema/etc are amazing, but Raiders tops them all in my book. A lot has been said over the years about how Lucas/Kasdan/Spielberg modeled ‘Raiders’ after the action/adventure serials of the 30s/40s. so I sat out to watch ‘Raiders’ with timecode and a pen to break them down. As someone who’s made more than a few short films, a coherent feature that’s structured on ~11min sequences is appealing to me both from a narrative/story structure and from possible advantages in low budget filmmaking.

Summary:

There are 10 sequences spanning an hour and fifty five minutes. Most sequences are in between 9:30 and 12:30, with two big exceptions of sequence 4 being bigger with its own midpoint and sequence 10 being very short (but with end credits). If averaged out, each sequence is 11min. Total action is roughly 22min, which is about 20% of actual screen time. A few of the times are rounded as I watched.

Sequence 1: The Raiders of the Idol

Time Length: 12:46
What happens: From start of walking through the jungle through getting the idol and fleeing onto the plane
What’s introduced: Indiana Jones as a character and his courage/adventure skills, his arch enemy Belloq
Action: Brief when someone tries to kill Indy, then 1:45 worth of action as he flees the cave
Who wins: Belloq

Sequence 2: Professor Jones

Time Length: 10:12
What happens: Indy teaches a class, talks to Marcus, get’s mission from Army Intel, talks with Marcus again as he packs up
What’s introduced: Indy’s professor occupation and skills, friend Marcus, Nazis as enemies, Ravenwood, entire goals for movie: Ark of the Covenant as goal, Staff of Ra headpiece, map room as guide, Well of Souls as destination. Also set up is Indy’s arc that he has no belief and instead curiosity is his belief.
Action: 0
Who wins: Technically no one, but Indy is doing well

//Turn to Act 2! We have a mission and a protagonist who’s committed.  We’re 23 minutes in.

Sequence 3: Marion Ravenwood

Time Length: 10:10
What happens: introduction to Marion as hard drinking heroine, their past, Nazis arrive and fight for medallion, bar burns down
What’s introduced: Marion as past lover and future partner, Nazi badguy
Action: 2:50 worth of gunfight in burning bar
Who wins: Indy

Sequence 4: Cairo

Time Length: 15:30
Special Note: This sequence is really broken into two halves of 8:17 and 7:13, the first sequence ending with Marion’s faked death.
What happens: The first half of the sequence is meeting Salah then walking in the market, fight breaks out and Marion ‘dies’. Second half is Indy is depressed, encounter with Belloq, back to Salah’s for meeting with the mystic who reads the headpiece. An interesting bookmark is the entire 15min sequence begins with the introduction of the monkey and ends with the monkey’s death from ‘bad dates’.
What’s introduced: Salah as ally, what’s happening in Cairo, race to the map room.
Action: 3:53 of chase/combat in the market
Who wins: draw. Marion “dies” but later Indy and Salah find out the Nazi’s are digging in the wrong place.

Sequence 5: The Dig! (aka the actual Archaeology)

Time Length: 10:30
What happens: Belloq and the Nazis dig and are frustrated. Indy goes into the maproom get’s real spot, they dig. Well of Souls is opened.
What’s introduced: Nothing really, just progress in the game we set up back in Sequence 2
Action: None
Who wins: Indy!

//Midpoint! We’re one hour in, the Well of Souls is opened, the actual raiding of the lost ark is now about to happen.

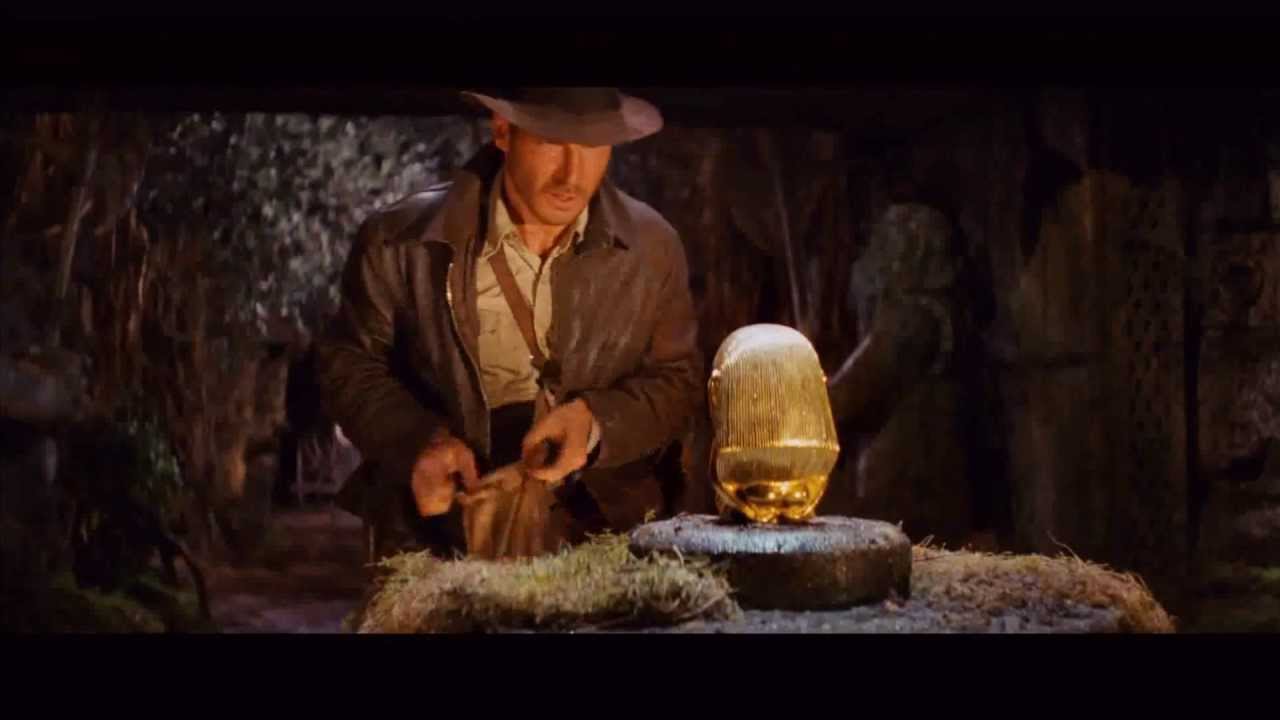
Sequence 6: Well of Souls (the innermost cave)

Time Length: 12:30
What happens: Indy and Salah retrieve the Ark while Marion dines with Belloq (nice cutaway contrasts). Belloq discovers Indy, steals the Ark and throws Marion in. This sequence begins with the Well of Souls being opened and ends with it being closed (with Indy inside).
What’s introduced: Further development of the game from sequence 2
Action: none, but tension from snakes and Belloq (who’s also a snake).
Who wins: Belloq/Nazis

Sequence 7: Death & Recovery of Life

Time Length: 9:25
What happens: Indy and Marion escape from the Well of Souls, only to immediately fight their way through the airplane badguys. The ark is loaded onto a truck.
What’s introduced: new plan for the Ark – bad guys want to take it to Berlin, now by truck.
Action: Little bit in Well of Souls, then 3:40 of fist fighting at plane.
Who wins: Indy

//Turn to Act 3! At 1:22, we have only 29 minutes left. Our hero has recovered his life, his girl and can now pursue the Ark on horseback.

Sequence 8: Recovering the Ark

Time Length: 12:00
What happens: epic action sequence of Indy fighting for the Ark on the truck, then safe arrival at large boat and him victorious, but physically broken. Final image is the swastika is burned off the Ark’s wooden box.
What’s introduced: setup that the Ark has real power in it
Action: Longest/best action sequence of the movie: a full 7.5min sequence at the truck
Who wins: Indy!

Sequence 9: Return of the Nazis

Time Length: 11:20
What happens: The nazis intercept the boat, steal Marion and the Ark. Indy pursues and gets the bazooka, but Belloq calls his bluff and at 1:44:00, Indy gives up.
What’s introduced: the Island, final set piece, and their plan to open it.
Action: Kinda none, though some as Indy swims out to boat and has to punch a few Nazis to get his bazooka.
Who wins: Belloq/Nazis, and fully. Indy has now totally lost.

Sequence 10: Return of God and the US Govt

Time Length: 7min then credits (so kinda 11)
What happens: They open the Ark, God kills everyone and Indy survives because he finally grabs hold of faith instead of his curiosity. Finale is the US Govt seizes the ark, Indy is mad but gets the girl. Credits role on final note of mystery/awe as the Ark is catalogued into a massive warehouse.
What’s introduced: Completion of all goals set forth in sequence 2
Action: maybe a minute of God melting Nazis
Who wins: God, Indy, US Govt

//Total Run Time: 1:51 then four minutes of credits, so 1:55 TRT

Conlusions:

I loved doing this and was surprised at how cleanly this movie moves forward on its sequences. There is very little re-use of locations between sequences and is almost perfectly linear in its progression. Definitely lots to glean from how they set this up. As a sneak of peek of what I’m researching next: the transcript of the Raider’s Story Conference.
Cheers!

Miniguns, Humvees & Mountaintops

…and corporate? Now we’re talking! I recently had the huge privilege of Directing the profile piece for Redmond, WA based company B.E. Meyers. Alongside my co-creative Isaac Marchionna, we sat out to tell the story of this company for their 40th anniversary that would engage the audience with the excitement that comes from products being used by Special Forces and warfighters in every branch of the service. Without further intro, check it out here https://vimeo.com/96955772

B001_C025_0410R5

[While Directing was my primary role, on day 3 I did operate and got this shot while barreling down a road. It was worth it :-).]

I think a common misconception is the speed at which a corporate piece can be done. Thankfully B.E. Meyers was willing to take the time to get it right: we did a unique and special development trip/process and then later shot for four full days to get the footage necessary for the video. The first two days were spent onsite at the factory doing interviews and gathering b-roll of the design/manufacturing/test/shipping departments. During these days I also was the one interviewing the on-camera personnel, which was a unique challenge to wrangle but enjoyable and rewarding at the same time. I definitely learned a lot about how to get people relaxed and engaged without going off a script.

On a gear front, we had a ton of fun with our toys on this gig. We used the Red Epic camera paired with Arri Ultraprimes. Then on the first two corporate days we used the Fisher 10 dolly, which greatly aided our speed and precision. As the Director, I never operated a shot on the Fisher, but still was extremely glad we had it because of how fast I could request a height change, a dolly push or even just the speed of being able to move the setup without the hassle of sticks. Also, the DP Domenic and I devised a nice strategy of on-camera filtration. Use of Schneider Digicon, Hollywood Black Magic and Blue streak filters really helped get us a more visually interesting piece than otherwise.

IMG_4968

[DP Domenic Barbaro rides his chariot.]

On our second day of corporate, we needed to get quality blackout product shots. We didn’t have time or budget to do another day at a studio, so we shot in an unused portion of their facility and rigged lights to the drop-panel ceiling.  Several viewers have thought these were CAD renders and not actual shots, so I’m extremely proud of how well these shots came out. Isaac did a good writeup of what it took for him in post to complete the circle 360 shot http://lawndartdesign.com/blog/revolutions

BEM_IM_1

[Temporarily on the Fisher to check framing. I insisted on the 32mm to fill the screen and help dramatically bring the flash hider into view on rotation, then I hopped off the dolly to eat donuts while everyone else did the real work. Photo by Isaac Marchionna.]

The last two days represented a significant production strategy shift and felt much more like making a movie. We spent two days at two different sites filming up-armored HMMWVS, night vision, live-fire machine guns, mountain tops and more. You know it’s a good location when you have to get your crew convoyed in on 20 minute ATV rides!

The hardest shot of the shoot, and also the most rewarding for me, was our most noteable non-Ultraprime shot. We used the Red 300mm to shoot two Operators walking a distant hill in profile. This shot took a lot of scouting, coordinating, and being in exactly the right place for the few minutes the light looked like that.

IMG_5003 B004_C006_04118R

[BTS and final result.]

Isaac did a great writeup on our thought process in putting the spot together http://lawndartdesign.com/blog/2014/5/21/the-cinematic-corporate. Also a huge shoutout to DP Domenic, Gaffer Casey Schmidt and crew Tyler and Alex for bringing incredible visuals to screen.

I’m really proud of this spot and look forward to doing more like it. Though now I’m spoiled, any shoot where this is your location at end of day, is a good one.

IMG_5007


Finally a Reel

Cutting a good reel is deceptively tough. The first step was to severely limit the length of it. Why? Because the worst thing a reel can do is bore you. So many get posted online and I usually find myself ready to fast forward or close it after about a minute and a half, even if the footage is spectacular. Maybe I just have a short attention span, but I figured perhaps enough other people do too. I figured that even if someone is busy I could talk them into watching for 90 seconds.

Tone can be a difficult thing to convey when you’re trying to project versatility. I have roughly four different styles thus far: military/action, gritty crime/scifi, narrative drama, and more glossy commercial/fashion. On one of my revisions my buddy Mark, who’s a full time editor, gave me the good feedback to have my first few edits all represent my different styles before shifting gears to explore each of these  in more depth.

Lastly, titles can be tricky. The purpose of this reel is to convey my skill set and artistic tastes as a Director or Commercial Videographer. I can’t label this a ‘Director’s Reel’ because I use a bunch of clips from ‘Into the Breach’ wherein the client was Director. On this shoot traditional titles didn’t really fit. I was the only filmmaker on set (apart from my AC Jerry) and you can read more about that fantastic experience in my earlier post. Several friends recommended I leave these clips out so I could cleanly label it ‘Director Reel’ but I’m very proud of what we accomplished. I felt an honest compromise was to avoid a title on the main reel and give a short explanation in the description giving proper credit. Plus I got special permission from the client (Crye Precision) to include unreleased clips in my reel. So of the four clips you see in my reel, two of them were not even in the original released piece.

I hope you enjoy it! It’ll be an interesting experiment to see if I get any work as a result of this.

Developing ‘Easy Day’

This year I got to be the writer/director/co-producer of a really unique project called ‘Easy Day’ with Chris Costa. In this blog post I want to talk about the development and below I include links to our early treatment, initial storyboards and actual script. In future blog posts I’ll talk about some on set and then post production experiences.

Inspired by the BMW films ‘The Hire’, we set out to create a hybrid entertainment/commercial piece.  The goals for this project were tough. Chris wanted a 3 minute video that would be entertaining first and foremost, and yet have the room to do some fun gunplay using the gear he’s affiliated with. Threading the needle of the requirements in the time allowed was a trick. Then to drive all this home, we’d have a professional ‘Behind the Scenes’ piece done to further explain what kit was used on set. If you haven’t seen them yet, get on over and give them a quick watch!

The process began back in June. My friend Isaac Marchionna has known Chris for years and introduced us. It helped that Chris had already seen my work for Crye Precision earlier this year (blog post on that project: https://cinetechure.wordpress.com/2013/05/31/into-the-breach/) and the three of us began to talk about what a commercial short might look like. We kicked around ideas on conference calls before Chris suggested I fly out to Wyoming for a weekend and develop it in person with him. So off I went! It was my first trip to the good part of the state and was a great weekend of creativity. We developed ideas that could stretch into a whole series. At the end I proposed a specific story that became ‘Easy Day’.

IMG_4087

After the Wyoming meeting I finalized a 1.5 page treatment that I’ll link to here: Treatment.

On the treatment, Chris gave sign-off that my write up was good. Since the treatment concisely described everything tangible that was to take place, we began Pre-Production with this, including recruiting the team, the locations and the resources. Isaac took a pass at storyboards for the first minute of the film: Costa Storyboards. Chris reviewed the storyboards and had some comments. It was really helpful, given the uniqueness of this project, to be looking at what the imagery might be at this stage.

CCStoryThumb

After that I dug in and created the actual script. It was tough, my first draft was 6 pages long – double the length we were allowed. I spent a lot of time shaving off any extraneous line of dialogue or action to get it down to the bare bones needed to get us through. I’ve attached the script as we used it, resisting the urge to clean up a few of my grammatical mistakes. Easy Day Script.

Short films are an easy target for critics because the tight time span gives you no room for maneuvering. In a feature you can take the time to dig into backstory, set up characters, explore situations and more. In a short, it really is get in fast, do something interesting and then GTFO. Finding the balance between a compelling short story vs trying to do too much can a tricky challenge.

I had a great time creating this production and really hope to work with Chris more, either in the furthering web series or in a feature film that would be just too much fun to write :-).

In a future blog post I’ll talk about Production and then later Post. Thanks for reading!

iOS app for movie script ideas ‘One Sheet’!

After creating my first iOS app, the interactive-video app for kids ‘Words With William’ (https://itunes.apple.com/us/app/words-with-william!/id658119098?ls=1&mt=8) that I detailed the creation of in my earlier blog post (https://cinetechure.wordpress.com/2013/06/17/ios-app-interactive-video/) I went through a huge list of ideas for my next app and settled on fulfilling a need I personally had.

Introducing my new app designed to help script writers create One Sheet movie idea pitches: https://itunes.apple.com/us/app/one-sheet/id739633884?ls=1&mt=8

When trying to keep track of new ideas for a feature film, I found I’d write them in my phone notes (where they’d get lost amongst grocery or Home Depot lists), scratch them on physical paper or notepads and often lose them. I set out to create an app that would help me keep track of the important information (Title, Genre, Logline, Synopsis). Quickly I created this but realized this wasn’t useful enough – I wanted this information automatically stored on my iCloud and with an iPad version of the app. I wanted to be able to come up with an idea on the go, start the info on my phone then, when home, pick up my iPad and keep expanding the idea.

After getting iCloud working in my app, as well as dual iPhone/iPad functionality, I realized I wanted more. I wanted the ability to generate an attractive looking PDF based on industry formatting and font. That step took awhile, as strangely, Apple’s iOS code does not give you PDF creation OR viewing for free, it all has to be created. Thankfully I found some good tutorials that helped me get to exactly where I needed to go. I added the ability to store author contact information universal to the app that would then be applied on any PDF created.

If you’re a script writer, or producer, or anyone who comes up with ideas for movies and desires to keep track of them – please give my app a whirl. Contact me with any questions or suggestions. If you like it, please give me a positive review in the app store. I’d really love to see this app get out there and get used!

The iPad version screen capture. The iPhone version simply splits these two screens.

The iPad version screen capture. The iPhone version simply splits these two screens.

PDF creation and distribution!

PDF creation and distribution!


Going Getty

Here is the rundown of my journey to getting my stock video library on Getty Images. If you’d just like to see my clips, here they are: http://www.gettyimages.com/Search/Search.aspx?contractUrl=2&language=en-US&assetType=film&p=Shawn+Nelson

Ever since upgrading to a professional camera in 2007 (My trusty Red #27), I’d considered the idea of entering the stock footage realm. Several of my friends such as Andrew Walker, Ryan E. Walters and Tom Lowe have all had success in selling their videos and timelapse photography online. Encouraged by Ryan’s helpful posts on stock footage (http://www.ryanewalters.com/Blog/blog.php) I decided that when I upgraded to my Red Epic that I’d take the plunge.

For numerous reasons, namely the challenge of it, I wanted to go straight to what I considered to be the premium stock footage location – Getty Images. After getting my Epic I did numerous trips to all the cool areas one can drive to around Oregon: the Gorge, the mountains, Eastern Oregon Desert and more. Sometimes I’d pack along a nearly full cinema setup, other times I figured out how to get my Epic down to a single backpack with Canon glass.

Everything I need minus the tripod!

Everything I need minus the tripod!

After shooting for about nine months or so, I figured my library was good enough. I edited together a demo reel and submitted it. Getty has a more intensive selection process then others. I had someone assigned to review me and, after viewing my reel, informed me that it was good, but they didn’t like all of my footage and wanted to see more. I went out and quickly shot a bunch more footage (thankfully it was sumer in Oregon) and created a second reel. She liked it, but wanted to do a phone interview. After 45 minutes of critiquing my footage (very helpful) and wanting to know all about me, my camera setup, my goals and more, I was finally approved to join as a Getty approved shooter.

After that process, I realized I needed to adjust my style. I then spent another year doing additional shoots more to the style I was told. I changed my strategy in interesting ways. I shot a music video and paid the actress (the lovely Lavenda Memory http://lavendamemory.blogspot.com/ ) to sign the Getty release (and explained what I’d be doing) so I could also sell all of the shots from the video. I detailed that shoot here: (https://cinetechure.wordpress.com/2013/05/30/a-run-n-gun-music-video/).

I also did a fun Cinephotography shoot with the lovely Monica Renee Watson (http://monicareneewatson.com/), wherein the result was a fun experimental vignette on running https://vimeo.com/51801389, still photos for hers and mine portfolio, as well as a nice batch of footage I could submit to Getty.  Getting the footage was challenging. I knew I’d want to cover at least a mile of the downtown waterfront park during the post dawn magic hour, while only having a single crew member (the every awesome Jerry Turner, esq). I also wanted shots pacing behind Monica as she jogged, and I don’t have a steadicam. I found my solution in tracking down a specialty bicycle that could hold 500lbs of cargo. We used it both to transport all our gear, and to allow me to ride in the front basket for all the jogging shots. It was a fun shoot!

Portable standalone reflectors are awesome

Portable standalone reflectors are awesome

It held everything!

It held everything!

I finally submitted my entire library in August, 197 clips. I could have submitted more, but I was very picky about only sending on over what I felt was worth selling. Surprisingly, Getty is not interested in the Raw R3Ds, and wants processed 1920×1080 ProRes 422 HQ files that have been graded. It took a long time to go through terabytes of footage, selecting only the pertinent moments, grading, chopping and exporting as desired. After mailing off the harddrive it took 2 months to see what they had selected.

To my big surprise, Getty approved 189 of my 197 clips, a nearly 96% approval rating. My collection can be seen here http://www.gettyimages.com/Search/Search.aspx?contractUrl=2&language=en-US&assetType=film&p=Shawn+Nelson

This gave me a bunch of motivation to spend the month of October getting out and shooting a bunch more, thanks to the unseasonably good Autumn weather we had here in Oregon. This time I chose to go out by myself, with help on only two occurrences (thanks again to Jerry for the help in Hood River and the bridge shoot, and to Isaac Marchionna for also helping on the bridge shoot and letting my use his Tokina).  For the shoots I was alone, using my recently acquired camera cart was a huge lifesaver in hauling all my kit around and giving me a mobile platform to work form.  I also tried to make my footage more dynamic, thanks to increased use of my EasyRig and Dana Dolly setups.

Getting the shot as the sun sinks

Getting the shot as the sun sinks – photo by Isaac Marchionna

So nice to not lug your kit by hand!

So nice to not lug your kit by hand!

Camera movement ftw

Camera movement ftw

I then got 103 clips submitted at the beginning of November. Depending on what they accept, I’ll do a follow on blog post where I give my thoughts on this go around.

Now I get to see what clips actually sell.  In the future I might go non-exclusive, but for now I’m glad to have gone with Getty and am really looking forward to adjusting what I shoot as I see customer choices.

I’m going to try to blog more often so thanks for reading, and if there’s any part of my gear/process/technique you’d like to see me touch on, comment below or shoot me a message. Thanks!

iOS App – Interactive Video

My first iOS app is now available on the app store! It’s designed to help preschoolers learn their letters, first numbers and colors. ‘Words With William!’ is basically a flashcard game but made interesting by how it’s  done primarily with video interaction. WWWilliam_Cap1_Home

https://itunes.apple.com/us/app/words-with-william!/id658119098?ls=1&mt=8

Shooting the video was nearly half the work. I knew that no matter how good the video was, the experience of building the game would teach me how the video should have been better. So I embraced a ‘rush the first pass’ strategy and shot just enough video  to go through the letters with barebones production. I only used an on-camera mic, quick lighting and that’s it. I then built the game up to the letters and started letting my 4yr old and 6yr old sons play it. I learned a bunch of notes on pacing, variety and more. Then when I re-shot all the video (this time with proper audio, better lighting and more) and felt a lot better about where it ended up.

I shot the video on my GH2 with a Nikon 50mm because I felt my Epic would have just been overkill for this. Plus I didn’t want the overhead of those files. Interestingly I added it up and realized I had about 3x more dollar amount in the audio setup I was using than my camera, since on an app like this having really good audio was paramount. I used a Sennheiser MKH50 into a Sound Devices 302, recording to a Tascam DR-40. On the lighting I specifically did not want to blow out the background to be nuclear white, I felt that would be too contrasty. The result is nearly white but not clipping with some off-white texture still in there. I used a heavily diffused Kino to make it bright but pleasing with nice catchlights.

On the programming level, getting the video to play seamlessly did take some effort. Using Apple’s top level UI element of the video player resulted in slow playback and flashes of green or white frames – very distracting. I had to go deeper into the AVFoundation layer to get the video playback I desired. Thankfully I was able to get the performance necessary to not queue up files ahead of time, I can serve them on demand with hardly any pause. Interestingly all the playback code is asynchronous, if you tell iOS to play the video you lose control of the code until it finishes. This made the logic a bit tricky, a ton of state-keeping and code blocks to get the logic where it needed to go.

Beyond just being a cute ‘Blues Clues’esque learning game, this app is proof of concept for video/app interaction. In order to build this I had 58 unique video files embedded in the app and specifically played, without any controls, based on user interaction in the app. Now that I’ve proven I can take this concept all the way to the app store, I could do a huge variety of video/app interaction like choose your own adventures, custom video training apps and more.

Into the Breach

In mid April I had the privilege of shooting a video for Crye Precision that went live on Memorial Day.

The experience of shooting it was a real challenge but deeply rewarding. It was a run n gun shoot by necessity – we traveled to three states over a six day period. A caravan of three vehicles to hold all nine cast/crew members plus gear necessitated only carrying things we were certain to need.

The first stop was at Dillon Aero for all the helicopter shots. We didn’t have a gyro but I found that doing a few things enabled me to get  stable footage – wide angle lens (25mm on an Epic 5k WS), 120fps  and we supported the camera with a bungie cord to reduce some of the weight. Plus I had the Oconnor O-Grips flipped upwards to allow me to get a  good hold of the front of the camera. The shots you see from the air in the video were all done in this manner. The first few takes took me some adjustment – I was harnessed in for safety, but was perched halfway outside the helicopter (my feet on the exterior skid).

Here you can see me in the rear seat as we lift off for another round of takes.

ShawnAtDillon2

The top two most challenging aerial shots was the one that appears in the final cut at 2:07 of the other helicopter in frame and then at 3:29 of the four guys running towards the car. The first one was difficult because I was trying to not only get the shot, but direct my pilot to be at the right relative position at the precise time the other bird is doing his full auto run down range. I think we got five takes before the Little Bird ran out of ammo (and yes, it was funny for that to be the reason you hear over the com why the take has to be over). My lesson there was how critical it is for both pilots to understand relative position to each other at a certain time in their joint movement. Thankfully we were able to get exactly the shot the client wanted.

All the helicopter footage was made extra challenging by not having my AC, Jerry Turner, in the bird with me. He was supposed to be, but because an Operator would be completely outside on the left skid they said they didn’t have the weight capacity. By operating solo I’d have to take one hand off the camera to push to talk to the pilot, then regain control of the camera and activate in a situation where everything is vibrating, not to mention that there were no doors on. On my first run I had a lot of difficulty getting to the record button – it was buried under the protective bagging. Thankfully for the remaining runs we activated the touch screen record feature the Epic has, which made it lot easier for me to hit record.

The shot of the four guys running towards the car (as seen from the air) presented an entirely different set of challenges. The four guys would go to their first position at a distance from the car, then the pilot would do a looping pattern. It was up to me to communicate both with the pilot and with the guys on the ground (via the radio) about when the guys should start running at the right moment in our loop for me to get the shot. It took a few takes but I got the hang of knowing how long it took the guys to run relative to how fast we were moving above them.

The shot at 3:08 was a fun one. In the final edit you only see the tail leaving. The full take is of the Little Bird taking off from directly over my head. To get a sense of just how close we were, here’s a picture of us getting the shot setup. I’m the one on the far left pointing.

ShawnAtDillon

I really wished I could have had my Easyrig with me for the running shots of chasing the Operators, but in the limited space caravan it was just one of the things that couldn’t go. Thankfully the Epic is really not that big of a camera, and we had it configured relatively lightly. Adjusting the O-Grips in a counter position helped me control it at the height I wanted. Here I am mid-action chasing one of the guys off the skid.

Chasing

The next day we got to shoot in a C-130, which was really enjoyable to me since my Dad was a C-130 pilot and captain when he was in the Marine Corps when I was a child. These planes, while not sexy like a fighter jet, are really cool to be in and around. On all the exterior shots I chose to use the Schneider Antique Suede #2. It really accentuates the desert and sunset colors in a way I really like and find difficult to dial in on color wheels.

For the interior lighting, which I expected to be red based on Hollywood movies, was actually a cool shade of teal. It had a quality to I haven’t seen before. Some lighting company company needs to create a ‘C-130 Interior’ gel. Thankfully most of our interior shots we were able to use the actual lighting system. We had to open up and really work the ends of the Epic, but I liked it better then trying to come in with a full compliment of lights to fake what already looked so cool.

ShawnInC130

The last day of shooting was the door breach scene. What made this such a fun shoot was that we’d be shooting at 300fps on all the action. Amazingly we were able to light it using a Honda eu2000i generator (powering a 1k and two 300w) plus one additional 650w on an exterior socket and a Litepanel on a brick. It wasn’t a high light level, but enough to simulate grungy street lighting. Then the final shot I got to put a real night vision adapter on my Epic and charge in with the guys. Several have asked me about those shots and all the NV is real, no post faking whatsoever.

ChargingIn

This shoot was a real pleasure to be on, not only to spend six days with a great group of people but getting images I’m deeply proud to have made. This shoot has given me an incredible new base level of experience in action/military shooting that I hope to build on.

Thanks to Jon for the BTS images!

A Run-n-Gun Music Video

Music videos can be as expensive or cheap as you want to make them. I knew that I’d be creating this music video on limited resources but I didn’t want to compromise the final image quality. The group I shot the video for is a charming folk/pop group out of the UK named Metaphorest http://metaphorest.bandcamp.com/ and their song ‘Everything, Baby’ is what I made the video for.

Go ahead and check out the video first since several of the pictures and descriptions in this blog are a  bit of a spoiler. It’s a short video, just over two minutes… https://vimeo.com/67034533

I think the absolute best run n gun decision you can make is what time of day to shoot, as that greatly reduces the need for silks, lights and more. I knew I wanted my video to encapsulate a larger magic hour. So more like the last two hours before sunset and then maybe thirty minutes past sunset – the best quality of light of the day. I then carefully planned my shoot for each location to have the light it needed. Thankfully we were shooting on my Red Epic, which with the RAW shooting and the fast Red Pro Primes, would enable the widest range of shooting time.

The first spot we shot at were the Rose Gardens. We had unexpected cloud cover so we were literally spotting patches of sun and running over to shoot under them. We had to move quickly, and in being in a public land for a non-commercial shoot we could not drop tripod sticks. The solution was the EasyRig, a support device I’ve come to really love. Here it came in super handy. I literally walked into the Rose Garden with the Epic already on the EasyRig and kept it on me for the entire hour we were there. Even while reviewing takes I could just maintain the camera. I paired it with the Oconnor O-Grips and was able to rapidly position the camera into a ton of off-axis shots I really prefer for this sort of dreamy/romantic style.

EverythingbabyBTS2EverythingbabyBTS1EverythingbabyBTS3

EverythingbabyBTS3 After that we moved onto the waterfront area. Again you can move very quickly when the light is perfect enough to just drop camera and go.

We ended up being a few minutes too late on a few shots I wanted with the sun, but such is the price you pay for doing that kind of dance.

EverythingbabyBTS4 We ended up on the bridge as we lost our light, which was a perfect place to shoot the lights of the city. I had to open up to the T1.8 wide open of the RPPs, but that’s a huge benefit to those lenses is how they maintain sharpness throughout the range.

Another point here is how much better it is to shoot in near darkness but not total darkness. Not a camera out there handles truly dark skies in a way that isn’t crawling with noise. I find that shooting in the final minutes of dusk gives me an image I can crush cleanly.


The one group of shots where the lighting really wasn’t what I wanted was the graveyard shots, which were actually the first of the day before magic hour got going. Under the trees in the spot I wanted to be in the light was just way too flat. Bringing in generators and lights was really not an option in this spot, so I shaped the light by using a 4×4 bounce from Nori Squarebounce and then had my assistant Thomas hold a 4×4 floppy just out of frame to give some negative fill. While still not a “bold look” per se, it went a long way towards giving the actor’s face some real contrast.

EverythingbabyBTS5

Thanks to Tyler Gould and Rob Werlinger for the BTS pictures! Also thanks to Tyler who gave creative input and operated a few of the shots. Thanks to Thomas Tullis and Meg Gamez for assistance and to Lavenda Memory and Nicholas Gamez for acting in it.

Funny little side note – it was after seeing these BTS that I finally realized how chubby I’d gotten (as a Director I’m not used to seeing myself on camera) and have since lost 30lbs. So the best weight loss advice I can offer is to get someone to take a ton of pictures of you work :-).

Traveling with the Red Epic

I just returned from a multi-state trip where we had to transport my Red Epic and all accessories (minus tripod) with us. It went really well – no hassles with TSA, no gear damaged and all went well on the shoot. A number of friends had expressed interest in hearing how it went so here was our strategy.

1. Carry on anything you are worried about luggage handlers dropping. For this I find the Pelican 1510 to be my favorite option. http://www.pelican.com/cases_detail.php?Case=1510 For my main Epic body case I use a padded 1510 with the liner organizer. In this I could fit the Epic body, 2x LCDs, 2x batteries, 1x charger, ND filters, all the important cables and the Red SSD reader. 

My AC, Jerry Turner, then carried on a 1510 with custom foam cut to hold three of my Red Pro Primes. I couldn’t trust my main primes to being checked in. Image


2. Check in a jumbo bag of accessories. In this went my Oconnor matte box, the dovetail, small LEDS, follow focus and more. For this I used the Kata OMB-77 bag, which is a nice big bag that can fit all my needed gear without being too big for check-in. I just now checked and it appears Kata discontinued this bag, which I think is a huge mistake as I love this piece of kit. In fact, it held so much that I exceeded my 50lb limit and had to start putting heavy items (dovetail, cardellini, etc) in my main clothing checkin. Image

3. Fly in a team. My AC carried on the 1510 of the lenses and since we wanted to bring more lenses, we put the 300mm, 14mm and 8mm carefully in his AC kit checkin bag. This made a huge difference. 

4. Think through your battery strategy. First I carefully read this document: http://www.faa.gov/about/office_org/headquarters_offices/ash/ash_programs/hazmat/aircarrier_info/media/airline_passengers_and_batteries.pdf

Then I devised a plan: I’d put 2 of the Red Bricks in the 1510 carry on with my Red Epic, then two in my Kata check-in, then my final 2 Red Bricks would go in my AC’s check-in. We made sure that EVERY battery was installed on either a charger, camera, light or battery plate.

5. TSA. Thankfully we had no issues at all with them other then the leaflets alerting us that they had somehow checked/manhandled our gear. In the main security line they didn’t even ask to have any of the cameras powered on. I was expecting conversation, swabbing, powering on cameras and all that and nothing happened. Granted I was only in the Portland, OR and Las Vegas airports, so perhaps that is a factor. Image

6. Your mileage may vary. A friend was traveling with his Epic in similar fashion (main body in the 1510) and successfully got through 3 airports before a US Airways agent got testy and forced him into checking his Epic in because she thought the 1510 “looked heavy”. I’m not sure what the strategy is for fighting this. I had no problems carrying on both my 1510s and putting them in the overhead compartments.

7. Don’t bother bringing a tripod. Unless you are there for an entire feature, it makes more sense to rent one locally then to bring one.

8. Bring any must-have gels. Thankfully we thought through what gels we’d really need and packed them. We thought of one more we’d like (party red) and the rental house didn’t have any gels at all and we were unable to ever stop at a place that would have them. Thankfully we had brought all that we really needed.

And lastly… lens wraps are your friend! For those who don’t know this wonderful little things, they are padded cloth with velcro at each corner that facilitates packing things, like lenses or LCDs or even just padding things out. I think we used four of them. I even used one to wrap my Arri follow focus in the main checkin bag. http://www.filmtools.com/lilewrthsi.html

I hope this was at least food for thought. Traveling to new locations with your kit is a lot of fun once you’re there. Transpo, not so much. But think through it and you should be fine.